Educator Resources
A River Runs Through It—A Watershed Art installation

Students work together to create an art installation of a watershed.
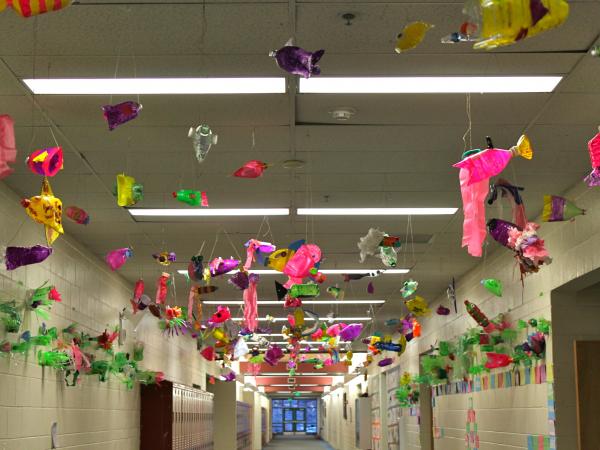
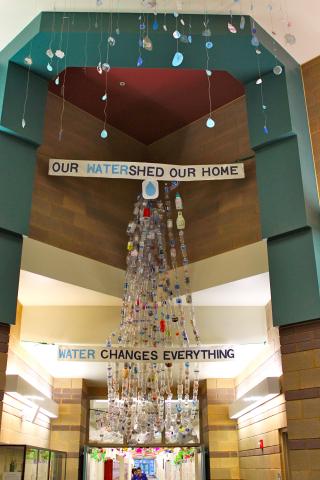
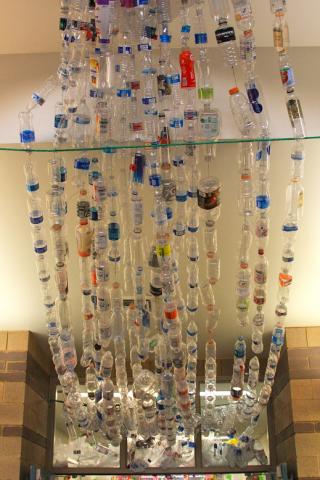
Recycled plastic serves multiple purposes in this project: it is reusable, economical material; it reflects the plastic waste that is in our water; and it shows students how much plastic we consume. Students create part of a waterfall, a fish, and a plant while learning about the different components of a watershed, including human impact on a watershed.
Objectives:
- Students will create elements of a watershed using recycled plastics
- Students will identify elements of human impact on a watershed
- Students will create an art installation representing a watershed
Basic Lesson Outline:
- Introduce the project—slide show
- Students create a waterfall, plants, and fish
- The watershed is assembled in the installation location
Art Supplies:
- Watercolor paints
- Acrylic paints
- Modge podge
- Paint brushes
- Water cups for brushes
- Scissors
- Plastic bottles
- Caps
- Tissue paper
- Glitter paint
- Colored masking tape
- Stapler
- Glue guns
- Hot glue
- Plastic film / plastic bags
- Hemp line / fishing line
- Thumb tacks
- Dowel or rod to hang the bottles
- Wire
- Wire cutters
- Eye screws
- Rope
- Colored pencils
- Drawing paper
Other Resources:
- Visual examples of fish and plants created from plastic
- Slide show to introduce project and related artwork (see outline at the end of the lesson plan)

Idaho State Learning Standards
Arts and Humanities: Anchor Standard 4: Convey meaning through the presentation/performance/production of an original work or unique interpretation of a work
- Objective PR1.1 Combine knowledge and understanding from two or more disciplines to present/perform their original or interpreted works for an audience
- Objective PR1.2 Convey meaning through their presentation/performance
LS2-MS Ecosystems: Interactions, Energy, and Dynamics
- LS2-MS-1. Analyze and interpret data to provide evidence for the effects of resource availability on organisms and populations of organisms in an ecosystem.
Further Explanation: Emphasis is on cause and effect relationships between resources and growth of individual organisms and the numbers of organisms in ecosystems during periods of abundant and scarce resources - LS2-MS-3. Develop a model to describe the cycling of matter and flow of energy among living and nonliving parts of an ecosystem.
Further Explanation: Emphasis is on describing the conservation of matter and flow of energy into and out of various ecosystems, and on defining the boundaries of the system - LS2-MS-6. Evaluate competing design solutions for maintaining biodiversity and ecosystem services
Further Explanation: Examples of ecosystem services could include water purification, nutrient recycling, and prevention of soil erosion. Examples of design solution constraints could include scientific, economic, and social considerations.
Academic Language:
- Subject area language: watershed
- Art language: art installation
Student Use of Vocabulary:
Students will use the words when creating their projects
Student Grouping:
Students will work individually or in small groups

Day 1 – Introduction
Introduce the project with a slide show (see additional resources)
Questions to ask:
- What do you see here?
- How do you think the artist created their work?
- Why do you think the artist made this piece?
- Students can use the paper and pencils to sketch ideas for fish and plants
Day 2 – Artmaking
- Discuss the significance of using the water bottles: their symbolism, recycling, the damage of plastic waste
- Demonstrate how to string the water bottles together (follow printed instructions included below)
- Working in small groups, students should string together their water bottles to create a waterfall
Day 3 – Artmaking
- Demonstrate plant creation with the class. Show the students examples of plastic plants.
- Students start creating their plants. Encourage the students to employ the three art techniques: cutting, gluing and embellishment.
- When students have finished their plants, decide how they will install them in the installation location
Day 4 – Artmaking
- Go over the fish creation with the class, showing the students examples of plastic fish
- Students begin creating their own fish
- Encourage the students to employ the three art techniques: cutting, gluing and embellishment
- When students have finished their fish, hang them up in the installation location
Day 5 – Artmaking
- Students should use this period to finish any uncompleted work.
Day 6 – Presentation
- Finish installation of student fish and plants in the installation location
- When the watershed is complete, the class should go into the hallway to look at and discuss their work
Questions to ask:
- What did we create?
- What did you learn?
- What is a watershed? What is your role in a watershed?
- How did you like doing an art project to learn about science?
Slide examples:
We will think about:
- What is a watershed?
- Why are watersheds important?
- What is our responsibility to a watershed?
Our art is inspired by plastics and other pollutants and their effects on a watershed
- Video: What really happens to the plastic you throw away? by Emma Bryce
What is an art installation?
- A 3D, sculptural piece of art that is designed for a specific space
- The art is usually temporary and changes how people view the space
- Examples: “Paper Planes” by Dawn Ng and “Melting Man” by Nele Azevedo
Photo of recycled bottle waterfall by Chinese artist Wang Zhiyuan
Questions to ask:
- What do you see here?
- What is this made out of?
- Where do you think this is?
- What is the artist telling his audience?
- How is this art related to water?
- Why and how is this an art installation?
Photo of plastic plants by Veronika Richterova
Questions to ask:
- What do you see here?
- What materials did the artist use?
- How many bottles did she use?
Photo of plastic leaves by Veronika Richterova
Questions to ask:
- What do you see here?
- What materials did the artist use?
- How many bottles did she use?
- How did she get the leaves to take their shape?
Three ways of manipulating plastic
- Cutting
- Gluing
- Embellishment
Cutting
- Takes away material
- Creates details
- Changes surface
Examples of cut plastic
- “Green Plant” by Artist Gulnuroz Daglar
Questions to ask:
- What material is used here?
- How much of the material has been taken away?
Cut plastic art by Eduard Aldrovandi
Questions to ask:
- What material is used here?
- How many bottles do you see?
- How do you think he did this?
Gluing
- We will be using modge podge and hot glue
- What does gluing allow us to do? Enables layering and embellishment
Examples of Layering
- Artists David Edgar and Jen Stark
Questions to ask:
- What materials did the artists use?
- How many layers can you see?
- How does layering change the appearance of the materials?
More examples of layering
- Artists Aurora Robson and Michelle Reader
Questions to ask:
- What do you see here?
- How are they similar and how are they different?
Embellishment
What is embellishment?
- Decoration
- Adding to
How can we embellish our plastic creations?
Paint
Add more plastic
Add other materials
Examples of embellishment
“Wreath” by Leanne Stock
Questions to ask:
What do you see here?
How is this embellished?
Stringing together water bottles to create a waterfall:
- Poke a hole in the plastic (nail or poking tool)
- Run the string through the bottle
- Make sure the beginning and end of the string are secure
- Attach more water bottles
- Attach your string of water bottles to a classmate’s string of water bottles
Creating a plastic fish:
- Choose a water bottle as the foundation for the fish
- Cut the water bottle in different ways to change the shape
- Take the cut pieces or other pieces of plastic and hot glue them onto the fish
- Embellish fish using paint, tissue paper, modge podge, glitter glue, and colorful tape
- Run a string through the fish so we can hang it in the hall
Creating a plastic plant:
- Choose a water bottle as the foundation for the plant
- Cut the water bottle in different ways to change the shape
- Take the cut pieces or other pieces of plastic and hot glue them onto the plant
- Embellish plant using paint, tissue paper, modge podge, glitter glue, and colorful tape
- Run a string through the plant so we can hang it in the hall

0 comments
Leave a Comment